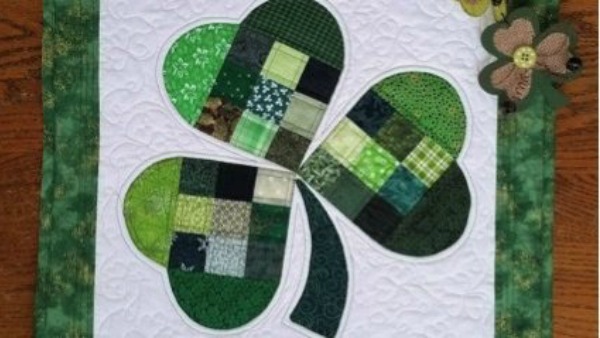
Happy St. Patrick’s Day everyone! When I saw the pattern for this cute, quilted wall hanging, I couldn’t resist making it.

The pattern is by Joan Ford on Bernina’s WeAllSew.com. Each heart-shaped shamrock leaf is made from 11 different fabrics, so I started this quilt by gathering up all the scraps of green quilt fabric in my house. (I’m embarrassed to admit that the photo below shows just a fraction of what I found.) 
I wanted my shamrock to end up slightly bigger than Joan’s, so all of my measurements are bigger than hers. I cut 2” squares from 27 different fabrics, and I tried to get a nice variety of patterns and darks and lights.
I arranged 27 pieces into three nine patches and stitched them together. (A nine patch is a quilt square made up of nine smaller squares.)
Next I cut the 2 ¾” strips that would become the rounded top of each shamrock leaf. Each nine patch block needed two.
Below is a photo of all three shamrock leaves, each made up of a nine patch and two 2 ¾” strips.
The next step is turning these squares into hearts using a fusible web. Fusible web is like a very thin sheet of plastic with glue on both sides. The glue is activated by heat, so you use your iron to apply the web to fabric.
There are several different brands of fusible web, and I used some scraps I found in my closet. One side of a fusible web is covered by a thin piece of paper, and I traced my heart pattern onto this paper. I used the heart pattern Joan provides on WeAllSew.com, but I made it slightly bigger. (No, I did not try to free-hand sketch a heart. And my heart pattern is covered with squiggles. Just ignore them.) I followed the same procedure for the stem.
After I traced the heart, I cut it out ¼” larger than my traced line. And there is no need to be accurate when cutting this, so I wasn’t.
I carefully positioned the wrong side of my quilt block onto the non-paper side of the heart. Then I ironed the heart to block, holding my iron on the paper-side for about three seconds. The photo below shows the backs of all three hearts fused to the three quilt blocks.

I cut (carefully this time) the hearts along the line I’d drawn.

Then I peeled the paper backing from the heart. The photo below shows the shamrock’s stem. As I pull back the paper, you can see the slightly shiny layer of adhesive left on the wrong side of the stem.

I arranged the stem and my three heart leaves onto my white background square, and then I fused them together with my iron.

I added a border, then batting, backing, and I quilted. I used a blanket stitch around the outside of the entire shamrock, and I quilted straight lines over the squares in the heart.
I added free motion shamrocks on the white background.
It makes a very festive table topper.
And I love it as a wall hanging! (I bought the hanger at Hobby Lobby.)
I very much enjoyed making this happy, scrappy shamrock. Be sure to join me next month as we explore another beautiful quilt.


It is beautiful. You did an awesome job of it.
Isn’t it cute! My sister is amazing.
I keep looking at this 9 patch and thinking, there has to be a way to lessen all the sewing of the tiny squares
Can you sew strips together and then use the strips to do the 9 patch
I don’t have the patience to sew 1.5 inch strips in sets of 3
But can’t remember exactly how to do it with strips…
OH WEL, anyway , this is really cute thanks for your tutorial
what is the finished size?
My husband is in memory care facilityand I am making him a quilt/wallhanging each month to commemorate holiday(s) and memories. I made a pretty potted tulip quilt for March and would love o add the Shamrock to it (as a pin on).
That is such a great way to use up scraps and come out with a cute finished project. I am feeling inspired to do one but heck I don’t have more than 5 green pieces of fabric. Weird hey! Thanks for sharing it
I wish you had the heart pattern so we could print it